DIY Home Safety Assessment: Room-by-Room Senior Guide
Learn to conduct your own home safety assessment with our detailed room-by-room guide. Identify fall hazards, accessibility issues, and safety improvements.

Why Every Family Needs a Home Safety Assessment
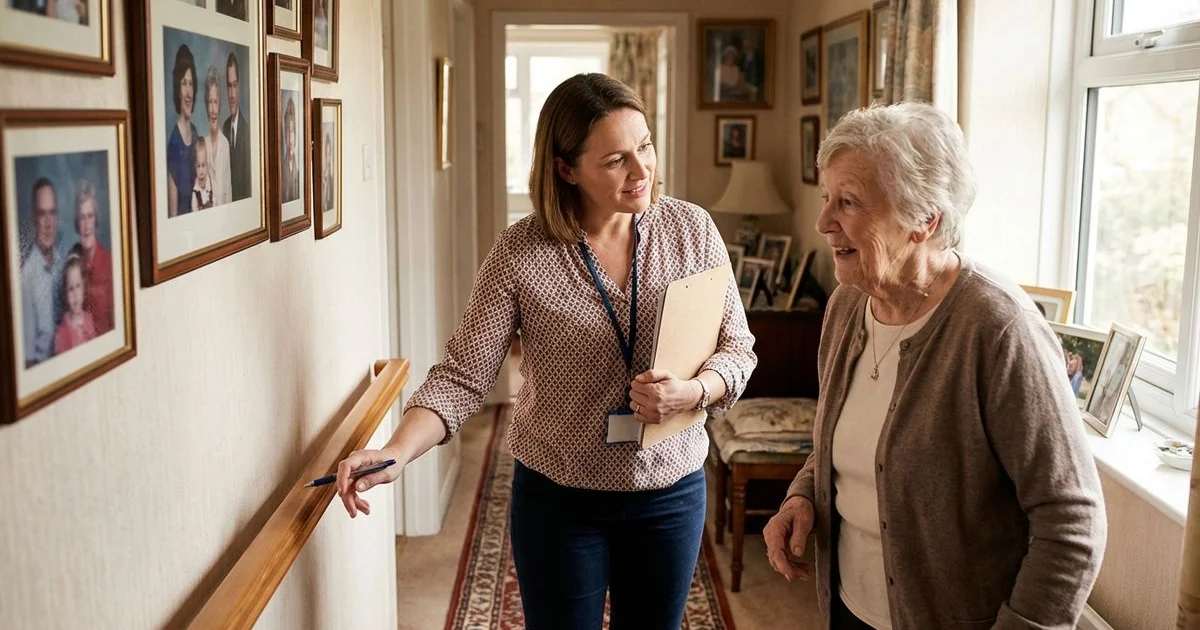
You know how most of us think we can spot a safety hazard just by looking around? The reality is often much subtler than a loose rug or a dark hallway. In our work with families, we find that the most dangerous risks are the ones hiding in plain sight, like a water heater set ten degrees too high or a grab bar that looks sturdy but is actually held up by suction cups.
A proactive assessment bridges the gap between hoping for the best and actually preventing a life-changing event. According to 2024 data from the CDC, falls are the leading cause of injury-related death for adults over 65, with one in four older adults falling every single year. The goal here is to identify those risks using professional standards before they become a statistic.
We have structured this guide to mirror the rigorous evaluation process used by CAPS-certified (Certified Aging-in-Place Specialist) professionals. You will need a flashlight, a measuring tape, and about 90 minutes to complete this walkthrough thoroughly.
Before You Begin: Assessment Tips
- Bring a measuring tape to verify specific ADA clearance widths and heights.
- Use a lux meter app on your phone to objectively test lighting levels rather than guessing.
- Walk the entire home mimicking your parent’s gait or using their mobility device to test clearance.
- Observe your parent performing daily tasks, as functional limitations often reveal hidden hazards.
- Take photos of measurements and complex areas to share with contractors later.
- Visit at night to identify shadows and low-visibility areas that disappear during the day.
Important: This DIY assessment is an excellent starting point, but it does not replace a professional assessment for complex situations. If your parent has dementia, uses a wheelchair, or has recently had a significant health change, consider scheduling a professional home safety assessment for expert-level evaluation.
Room 1: Entryway and Front Porch
The transition from outdoors to indoors is a critical zone where lighting changes and uneven surfaces create a “double hazard.”
Exterior Checklist
- Walkway surface is even with no cracks, heaving, or loose pavers.
- Ramps (if present) meet the 1:12 slope ratio standard (one foot of length for every inch of rise).
- Steps have continuous handrails on at least one side (both sides preferred).
- Porch lighting delivers at least 300 lux to the walking surface for visibility.
- Doorbell and house numbers are reflective and visible from the street for emergency responders.
- Door threshold is flush or acts as a “saddle” no higher than 1/2 inch.
- Welcome mat is a heavy-duty, low-profile rubber type that does not curl.
- Snow and ice removal plan is confirmed for winter months.
Interior Checklist
- Entryway clear width is at least 32 inches when the door is open at 90 degrees.
- Entry area has a sturdy chair or bench (17-19 inches high) for seated shoe changes.
- Shoe storage keeps footwear completely off the walking path.
- Light switch is accessible immediately upon entering (rocker switches are preferred over toggles).
- Floor transition from exterior to interior avoids high-contrast patterns that can look like steps.
- Coat hooks and storage are mounted between 40 and 48 inches for easy reach.
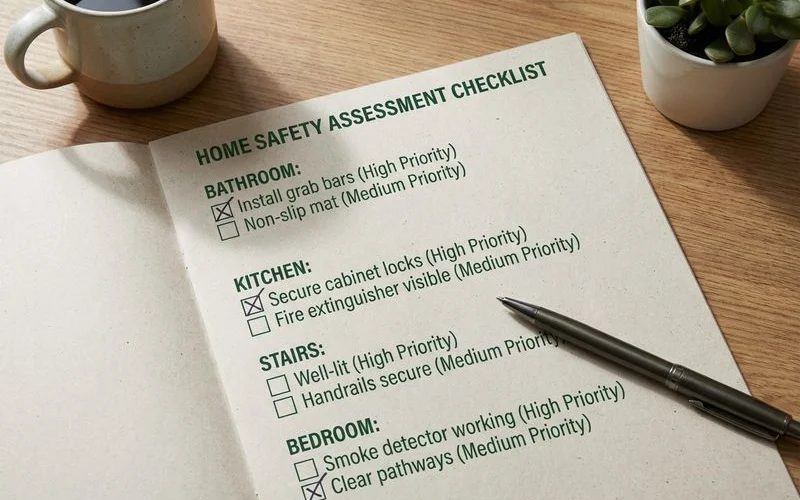 A systematic checklist ensures no safety hazard goes overlooked
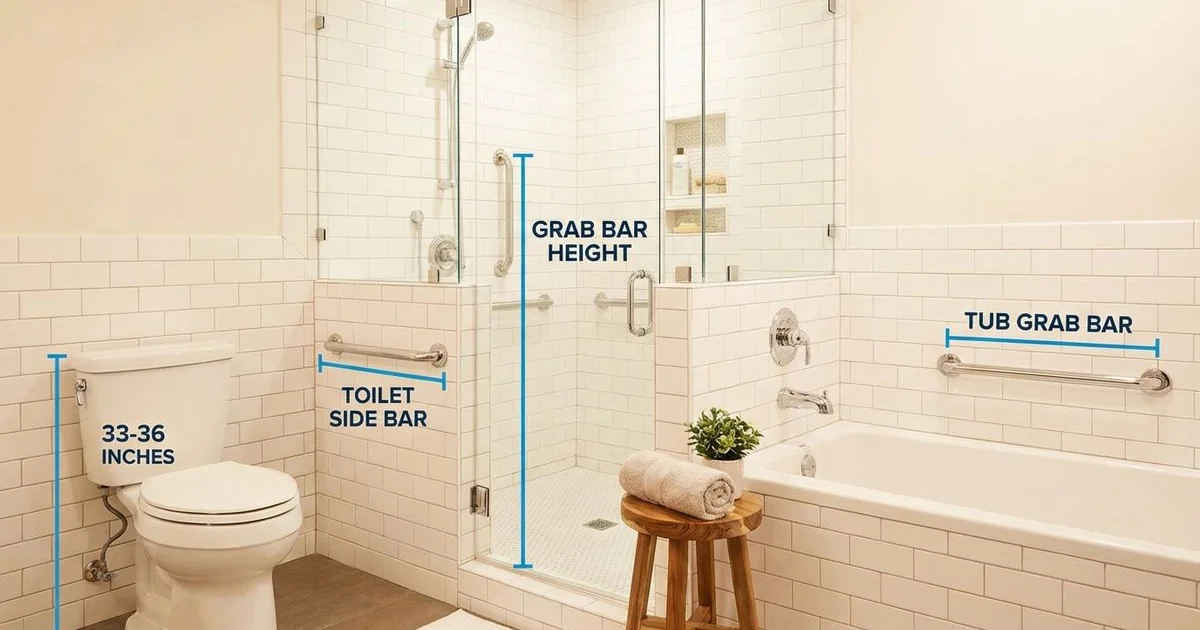
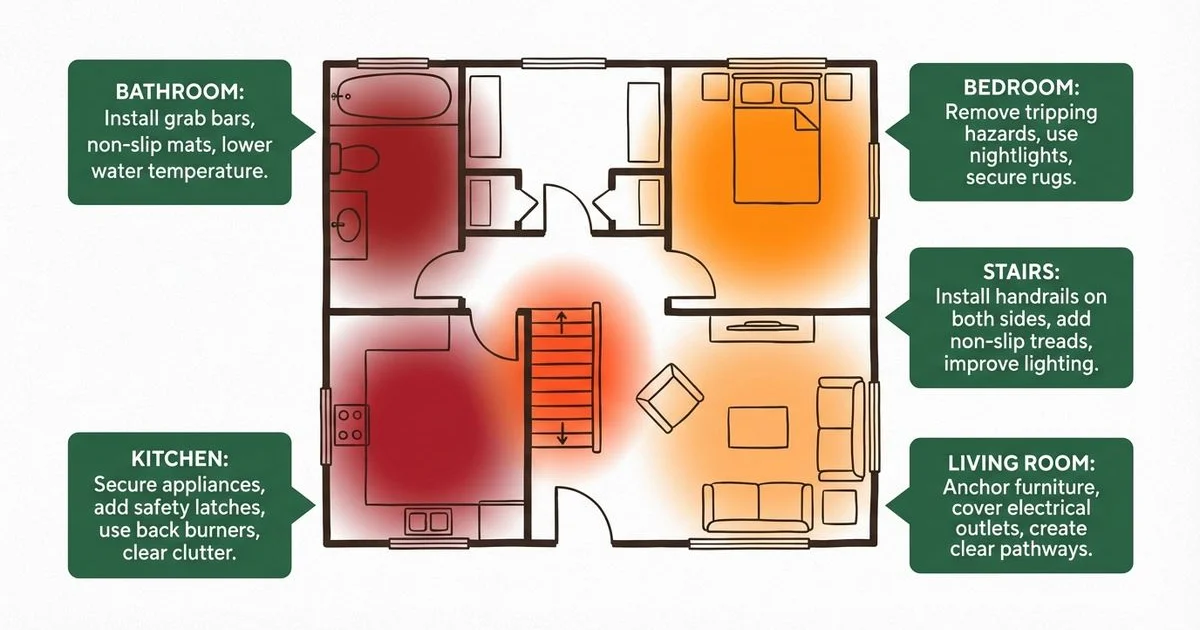
Room 2: Bathroom
We consider the bathroom the “zero-margin-for-error” zone because hard surfaces and water create an immediate injury risk.
Critical Safety Items
- Grab bars installed next to the toilet (support capacity of 250 lbs minimum, 1.25-1.5 inch diameter).
- Grab bars installed in the shower (vertical bar at entry, horizontal bar on long wall).
- Floor tiles have a Dynamic Coefficient of Friction (DCOF) rating of 0.42 or higher (0.60 recommended).
- Non-slip bath mat outside the tub has a rubberized backing that does not slide.
- Toilet seat height is between 17 and 19 inches (ADA chair height) to aid standing.
- Shower bench or chair is stable and has rubber tips on all legs.
Additional Safety Items
- Hot water temperature is set to exactly 120°F (49°C) to prevent scalds (burns occur in 2 seconds at 150°F).
- Anti-scald pressure-balancing valve is installed in the shower.
- Medications are stored in a drawer or cabinet between waist and shoulder height.
- Lighting achieves 3000-4500 lumens total to reduce grooming errors.
- Night light (amber color preferred) illuminates the path from bedroom to bathroom without disrupting sleep.
- Electrical outlets have GFCI protection to prevent shock.
- Door swings outward or has rescue hardware to allow emergency access if someone falls against it.
- Personal emergency response system (PERS) button is waterproof and mounted within reach in the shower.
For a complete list of bathroom safety modifications, see our senior bathroom safety checklist.
Room 3: Bedroom
Falls here often happen during the “transfer” phase when a senior moves from lying down to standing up.
Checklist
- Bed height allows feet to rest flat on the floor while sitting (optimal range is 20-23 inches).
- Mattress has firm edges to support pushing up from a seated position.
- Bedside table is heavy and stable enough to support weight if grabbed for balance.
- Touch-activated lamp or accessible switch is reachable from the bed.
- Phone or medical alert charging base is within arm’s reach of the pillow.
- Path to the bathroom is completely clear of furniture and measures at least 36 inches wide.
- Motion-sensor night lights are positioned low to the floor to guide walking.
- Area rugs are removed or secured with carpet tape (double-sided tape often fails over time).
- Closet rods are lowered or pull-down rods are installed to avoid overhead reaching.
- Electrical cords run behind furniture or along baseboards using cord clips.
Room 4: Kitchen
The kitchen combines fire risks with fall hazards, so our focus shifts to accessibility and fire suppression.
Checklist
- Frequently used items are stored in the “golden zone” between hip and shoulder height.
- Sturdy step stool with a handle is available (chairs should never be used for reaching).
- Anti-fatigue mat in front of the sink has beveled edges to prevent tripping.
- Floor is kept dry and checked for leaks (consider a water leak sensor under the sink).
- Spills are cleaned immediately using a reach-tool or long-handled mop.
- Oven controls are front-mounted so there is no reaching over hot burners.
- Microwave is placed on the counter or in a lower cabinet shelf.
- Task lighting under cabinets provides at least 500 lux on work surfaces.
- Fire extinguisher is a Class K unit (specifically for grease fires) or a kitchen-rated ABC model.
- Automatic stove shut-off device (like FireAvert) is installed for electric ranges.
- Cabinet hardware consists of D-shaped pulls rather than small knobs for easier gripping.
Room 5: Living Room and Common Areas
These are the spaces where seniors spend the most waking hours, so comfort and safety must be equally prioritized.
Checklist
- Furniture arrangement creates a clear 36-inch turning radius for walkers.
- Seating heights are firm and raised (17-19 inches) to prevent “rocking” to get up.
- Primary chair has sturdy armrests that extend to the front edge of the seat.
- Electrical cords are managed with cable raceways or clips along the wall.
- All throw rugs are removed (this is the single most common recommendation we make).
- Coffee tables are placed 18 inches from the sofa or removed to open up space.
- Remote controls and phones are consolidated in a side caddy to prevent over-reaching.
- Ambient lighting is cool white (3000K-3500K) to improve contrast for reading.
- Thresholds between rooms are flush or use a rubber transition ramp.
- Pet bowls and toys are assigned a specific “zone” out of the main walkway.
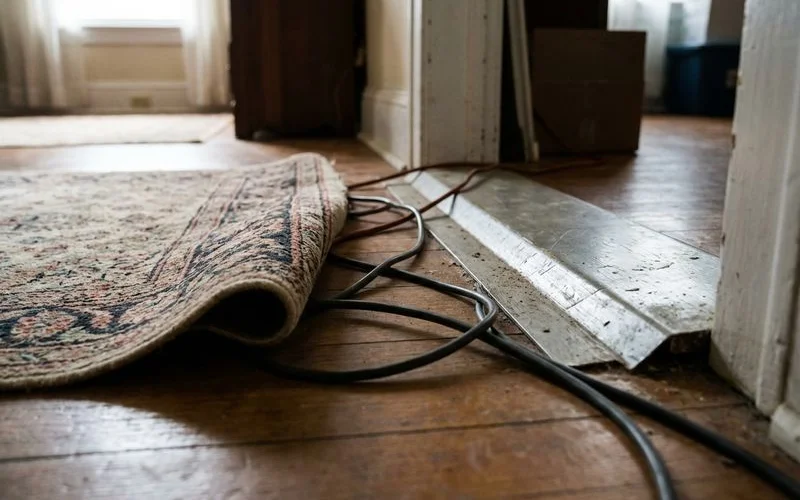 Many of the most dangerous fall hazards are hiding in plain sight
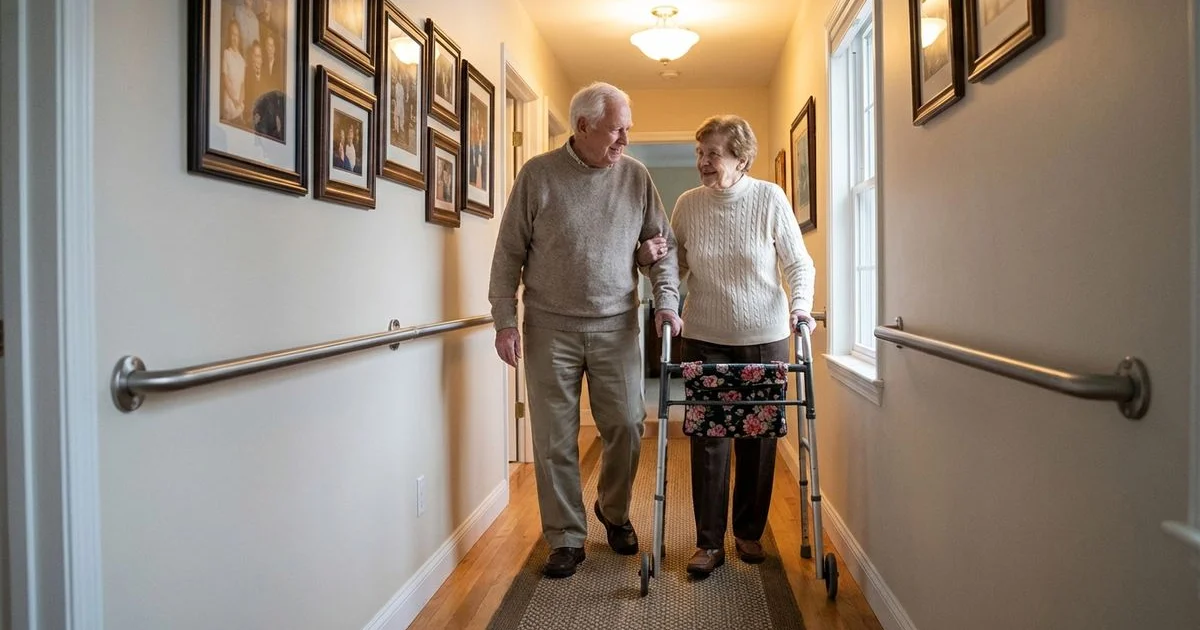
Room 6: Stairs and Hallways
Stairs account for a massive portion of severe injuries, so we treat this area with zero tolerance for hazards.
Stairway Checklist
- Continuous handrails are installed on both sides (not just one).
- Handrails extend 12 inches beyond the top and bottom steps (ADA requirement).
- Handrail diameter is between 1.25 and 2 inches for a secure power grip.
- Steps are uniform in height (7 inches max riser) and depth (11 inches min tread).
- Step edges have high-contrast non-slip tape to define the nose of the stair.
- Carpet is low-pile and tightly secured (no runners that can bunch up).
- Lighting illuminates every tread clearly with no dark patches.
- Light switches at top and bottom are illuminated or glow-in-the-dark.
- Stairs are completely free of “staging items” like laundry baskets or mail.
- Stair lift feasibility is evaluated if climbing requires pulling on the rail (see our stair lift buying guide).
Hallway Checklist
- Hallway width is at least 36 inches clear (42 inches is better for turning).
- Lighting includes motion sensors or stays on 24/7 using efficient LED bulbs.
- Console tables or decorative items do not intrude into the 36-inch walking path.
- Floor runners are removed or secured with permanent carpet tape.
Room 7: Laundry Area
The laundry room often requires carrying heavy loads while navigating tight spaces, which is a recipe for imbalance.
Checklist
- Washer and dryer are moved to the main floor if possible to avoid basement stairs.
- Pedestals (12-16 inches high) are installed under front-loading machines to reduce bending.
- Folding table or counter is available at waist height (34-36 inches).
- Floor drain has a sensor or automatic shut-off valve to prevent slip hazards from leaks.
- Detergent and supplies are stored in easy-pour containers at waist height.
- Overhead lighting is bright (800+ lumens) to help spot stains without eye strain.
Room 8: Garage and Exterior Spaces
Checklist
- Step from garage to house has a sturdy handrail and contrasting edge tape.
- Garage floor is free of oil spots (use absorbent clay or degreaser).
- Driveway to door path is lit with at least 1-2 foot-candles of light.
- Garden hoses are stored on reels and never left coiled on the ground.
- Outdoor seating is stable, weather-resistant, and has armrests for support.
Scoring and Prioritizing Your Findings
After completing your walkthrough, count the unchecked items in each room. We use this scoring model to help families decide what to tackle first.
| Unchecked Items | Risk Level | Action Needed |
|---|---|---|
| 0-2 per room | Low | Make minor improvements and re-check in 6 months. |
| 3-5 per room | Moderate | Address these hazards within 30 days. |
| 6+ per room | High | Immediate action required; consider professional help. |
You should prioritize the bathroom and stairs regardless of the score. These two areas are responsible for the highest frequency of severe falls according to injury data.
When to Call a Professional
There are times when a DIY checklist simply isn’t enough to capture the nuance of a home’s safety needs. We recommend seeking a professional evaluation from a CAPS-certified specialist if:
- Mobility has changed: Your parent has recently started using a cane, walker, or wheelchair.
- Cognitive health is a factor: Your parent has been diagnosed with dementia, Alzheimer’s, or significant cognitive decline.
- History of falls: Your parent has experienced a fall in the past six months, even a minor one.
- Complex architecture: The home has split levels, spiral staircases, or unusually narrow hallways.
- Renovation plans: You are considering major renovations and want expert guidance on high-impact modifications.
A professional home safety assessment typically costs between $200 and $500 depending on your region. This service provides a detailed report with prioritized recommendations, precise cost estimates, and trusted contractor referrals. For many families, this small investment prevents thousands of dollars in hospital bills and allows their loved ones to age in place safely.
Taking Action
The most important step is the one you take after putting down the clipboard. We suggest choosing the three highest-priority items—like installing a grab bar, securing a rug, or changing a lightbulb—and committing to fixing them this weekend. Small, specific changes are often all it takes to turn a hazardous house into a safe, comfortable home.
Ready to Take Action?
Learn more about our comprehensive home safety assessments solutions and how they can help your family.
Explore Home Safety Assessments About Margaret Chen
Certified Aging-in-Place Specialist & Senior Care Advisor
CAPS-certified senior care advisor with 15+ years helping families plan for safe aging at home.
Related Articles
Fall Prevention for Seniors: The Complete Home Safety Guide
Evidence-based fall prevention strategies for seniors covering home modifications, exercise, medication management, and environmental hazard reduction.
Where and How to Install Grab Bars: Location Guide With Diagrams
Expert guide to grab bar placement in bathrooms, hallways, and bedrooms. Includes installation heights, recommended products, and DIY vs. professional advice.
The 5 Most Dangerous Rooms in Your Home for Seniors (and How to Fix Them)
Discover which rooms pose the greatest fall and injury risks for seniors, with specific modifications to make each room safer.