Where and How to Install Grab Bars: Location Guide With Diagrams
Expert guide to grab bar placement in bathrooms, hallways, and bedrooms. Includes installation heights, recommended products, and DIY vs. professional advice.

Why Grab Bars Are the Most Important Home Safety Modification
We see the same dangerous scenario play out in homes every single week. A family installs a grab bar only after a serious fall occurs, treating it as a reaction rather than a prevention method.
This delay often has costly consequences. According to 2024 data from the CDC, falls are the leading cause of injury-related death for adults age 65 and older, resulting in over 3 million emergency department visits annually.
Our team has completed over 2,000 home safety assessments, and the data is clear. Correctly installed grab bars are the single most effective intervention for preventing these accidents.
However, simply screwing a bar into the wall isn’t enough. A grab bar mounted at the incorrect height or attached to drywall without specific load-bearing anchors is a liability. It provides a false sense of security that can lead to catastrophic injury if the fixture rips loose under weight.
Here is the exact protocol we use to determine where to place grab bars, the load capacity required, and how to ensure the installation is secure.
Bathroom Grab Bar Placement: The Critical Locations
The bathroom is the epicenter of fall risk due to the combination of slippery surfaces and the physical effort required to sit and stand. We focus on three specific zones: the toilet, the shower, and the transition areas.
Near the Toilet
Sitting down and standing up from a toilet requires significant quadriceps strength and balance. This motion is where many seniors experience a drop in blood pressure, leading to dizziness.
We follow ADA (Americans with Disabilities Act) guidelines as a baseline for residential safety.
- The Side Wall Horizontal Bar: Install a bar on the nearest side wall. It should be 42 inches long ideally, located 12 inches maximum from the rear wall. Mount this bar 33 to 36 inches above the finished floor.
- The Vertical Assist Bar: Place a vertical bar on the side wall, starting 39 to 40 inches above the floor and extending upward 18 inches. This placement allows the user to pull themselves up using arm strength rather than relying solely on their legs.
- Clearance Space: Ensure there is exactly 1.5 inches of space between the grab bar and the wall. This gap is critical; it is wide enough for a solid grip but narrow enough to prevent an arm from slipping through and getting trapped in a fall.
Pro Tip: If the toilet is not next to a wall, we recommend installing a floor-mounted pedestal bar. These must be anchored into the concrete or subfloor, not just the finished tile, to handle the lateral force.
In the Shower
The shower presents the highest risk because soap and water reduce friction to near zero. We designate this the “zero-fail zone” because slipping here often results in head injuries from striking fixtures.
- The Entry Bar: Mount a vertical bar on the wall designated for entry and exit. Position it 33 to 66 inches vertically from the floor. This provides a stable anchor point for the dangerous transition of stepping over a threshold with wet feet.
- The Long Wall Horizontal Bar: Install a horizontal bar along the back wall, 33 to 36 inches from the floor. We recommend a minimum length of 24 inches, though 36 inches provides better coverage for a user moving under the water stream.
- The Control Wall Bar: If space permits, place a smaller bar near the faucet controls. This allows the user to stabilize themselves with one hand while adjusting water temperature with the other.
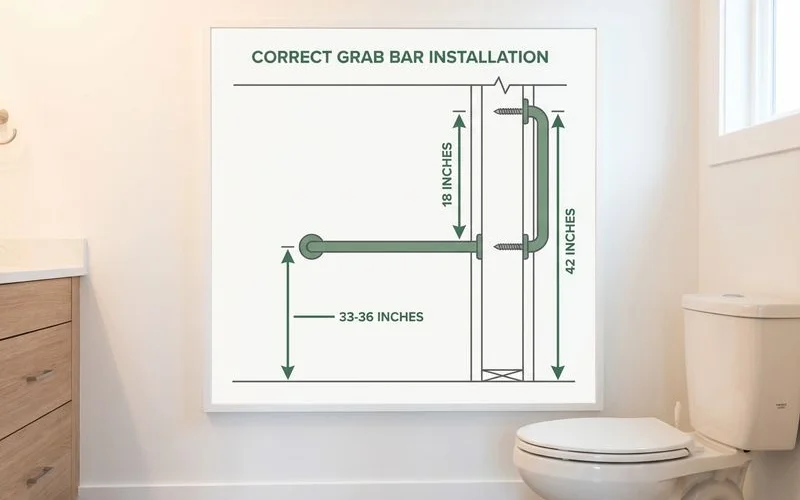 Proper grab bar placement near the toilet requires both horizontal and vertical bars at specific heights
Around the Bathtub
Bathtubs pose a unique mechanical challenge because the user must lift their leg high to clear the rim while balancing on one foot.
- The Entry Vertical Bar: Install this bar at the entry side of the tub, spanning 32 to 66 inches above the floor. This is the primary support for the step-over motion.
- The Back Wall Horizontal Bar: Mount a bar on the long back wall. Unlike showers, this should be lower, typically 9 inches above the tub rim (not the floor). This height is accessible to a person sitting in the bath who needs to hoist themselves up.
- The Faucet Wall Bar: A diagonal or vertical bar on the faucet wall assists with the transition from sitting to standing.
For combined tub-showers, we often install a reinforced slide bar. Standard slide bars cannot support weight, so you must specifically purchase an ADA-rated grab bar slide mechanism.
Hallway and Bedroom Grab Bar Placement
Bathrooms are not the only danger zones. Our data shows that nighttime transit between the bedroom and bathroom is a frequent time for falls due to low light and drowsiness.
Hallways
Long hallways can be disorienting for those with balance issues. We recommend installing continuous handrails rather than short, segmented bars.
- Height: Mount rails at 34 to 38 inches above the floor.
- Continuity: Ensure the rail extends 12 inches past the top and bottom of any ramp or transition.
- Returns: The ends of the rail should curve back into the wall (a “return”). This prevents loose clothing or purse straps from snagging on the end of the rail, which can jerk a person backward.
Bedrooms
Getting out of bed often causes orthostatic hypotension (a sudden drop in blood pressure).
- Bedside Wall Mount: If the bed is near a wall, install a vertical bar aligned with the user’s waist when sitting up in bed.
- Height Calculation: A horizontal bar should be positioned at mattress height plus 8 to 12 inches.
- Alternative Support: For beds in the middle of a room, a “floor-to-ceiling” tension pole (like the Stander Security Pole) offers support without drilling into walls.
Choosing the Right Grab Bars
The market is flooded with cheap, decorative bars that cannot withstand the 250+ pounds of sudden force generated during a fall.
We strictly use bars that meet or exceed ASTM F446 standards.
| Feature | Recommended Specification | Why It Matters |
|---|---|---|
| Material | 18-gauge, 304 Stainless Steel | Resists rust in humid environments; thinner metals may bend. |
| Diameter | 1.25 to 1.5 inches | 1.5” is standard, but 1.25” is safer for seniors with arthritis or smaller hands. |
| Flange | Concealed 3-hole flange | Provides multiple drilling points to hit studs; concealed covers prevent rust buildup. |
| Finish | Peened or Knurled | Smooth chrome becomes slippery when soapy. Textured finishes ensure grip. |
| Clearance | 1.5 inches exactly | Prevents arm entrapment between the bar and the wall. |
Avoid “suction cup” grab bars entirely. We have seen these devices fail repeatedly because tile is porous and humidity changes break the vacuum seal. A suction bar is a temporary travel aid, not a permanent safety device.
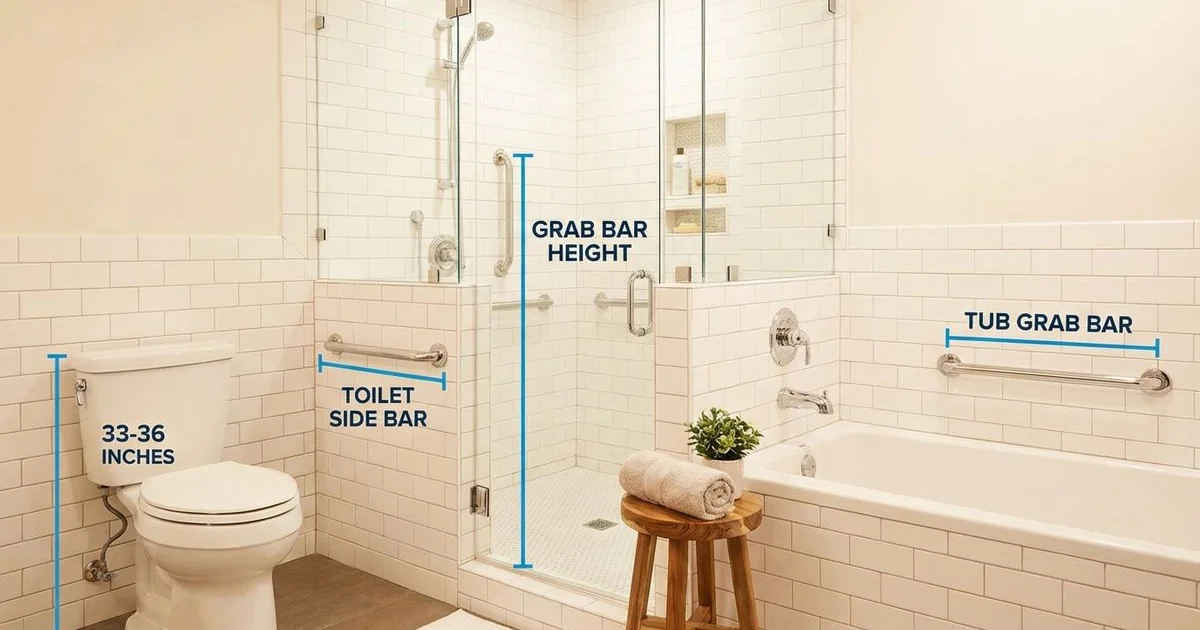
 Well-placed grab bars provide crucial support during the most fall-prone bathroom activities
DIY vs. Professional Installation
Installing a life-saving device requires precision. If a towel rack falls, it is an annoyance; if a grab bar fails, it is a hospital visit.
When DIY Is Appropriate
You can likely handle this project if you have general carpentry experience.
- Stud Verification: You have confirmed the presence of wood studs (16-inch on center) using a high-quality stud finder.
- Tool Access: You own a power drill and, critically, a diamond-grit hole saw if drilling through porcelain tile. Standard masonry bits will often shatter porcelain.
- Stud Alignment: The desired location of the bar lines up perfectly with the studs.
Materials for a DIY project usually cost $30 to $60 per bar.
When to Hire a Professional
We strongly advise calling a specialist in specific structural situations.
- No Studs Available: If the bar must go where there is no stud, you need specialized blocking or high-grade hollow wall anchors like WingIts. Standard drywall toggles are insufficient.
- Fiberglass Surrounds: Installing onto a fiberglass tub insert requires finding the gap between the fiberglass and the framing. Doing this wrong cracks the unit.
- Metal Studs: Commercial buildings and some condos use metal studs, which require different fasteners (snap toggles) than wood framing.
Professional installation generally costs $150 to $300 per bar. This price includes the liability assurance that the bar is anchored correctly.
Critical Safety Warning: Never use plastic drywall anchors. A 200-pound person generating momentum during a fall can exert over 500 pounds of dynamic force on the bar. Plastic plugs will pull straight out of the drywall.
Common Installation Mistakes to Avoid
Our team frequently has to re-install bars that were placed incorrectly by handymen or well-meaning relatives.
- Mounting on Grout Lines: Drilling directly into grout often cracks the surrounding tiles because grout lacks structural integrity. Always drill through the face of the tile.
- Angling Bars Incorrectly: While diagonal bars look “ergonomic,” the hand can slide down them during a fall. Horizontal and vertical bars provide safer, more predictable stopping points.
- Ignoring the Door Swing: We often see bars installed where they block the shower door from opening fully, creating an entrapment hazard.
- Using Non-Stainless Screws: Using the wrong screws leads to rust streaks down your tile within months. Always use the stainless steel mounting hardware provided with high-quality bars.
- Forgetting the Transition: As noted in our guide to fall prevention, the path to the bathroom is just as critical as the bathroom itself.
Creating a Complete Grab Bar Plan
Reactive safety measures are rarely as effective as proactive planning. We recommend mapping out the user’s “path of travel” through the home to identify every transition point where balance is compromised.
You should view grab bars as one component of a larger ecosystem. Combine them with high-contrast lighting (to help aging eyes see depth) and the removal of throw rugs. A holistic approach significantly reduces risk.
The cost of installation is negligible compared to the alternative. The average cost of hospitalization for a fall-related hip fracture now exceeds $40,000. Start with the priority zones in the bathroom and expand outward to create a home that supports independence.
Ready to Take Action?
Learn more about our comprehensive fall prevention solutions and how they can help your family.
Explore Fall Prevention About Margaret Chen
Certified Aging-in-Place Specialist & Senior Care Advisor
CAPS-certified senior care advisor with 15+ years helping families plan for safe aging at home.
Related Articles

DIY Home Safety Assessment: Room-by-Room Senior Guide
Learn to conduct your own home safety assessment with our detailed room-by-room guide. Identify fall hazards, accessibility issues, and safety improvements.

Fall Prevention for Seniors: The Complete Home Safety Guide
Evidence-based fall prevention strategies for seniors covering home modifications, exercise, medication management, and environmental hazard reduction.
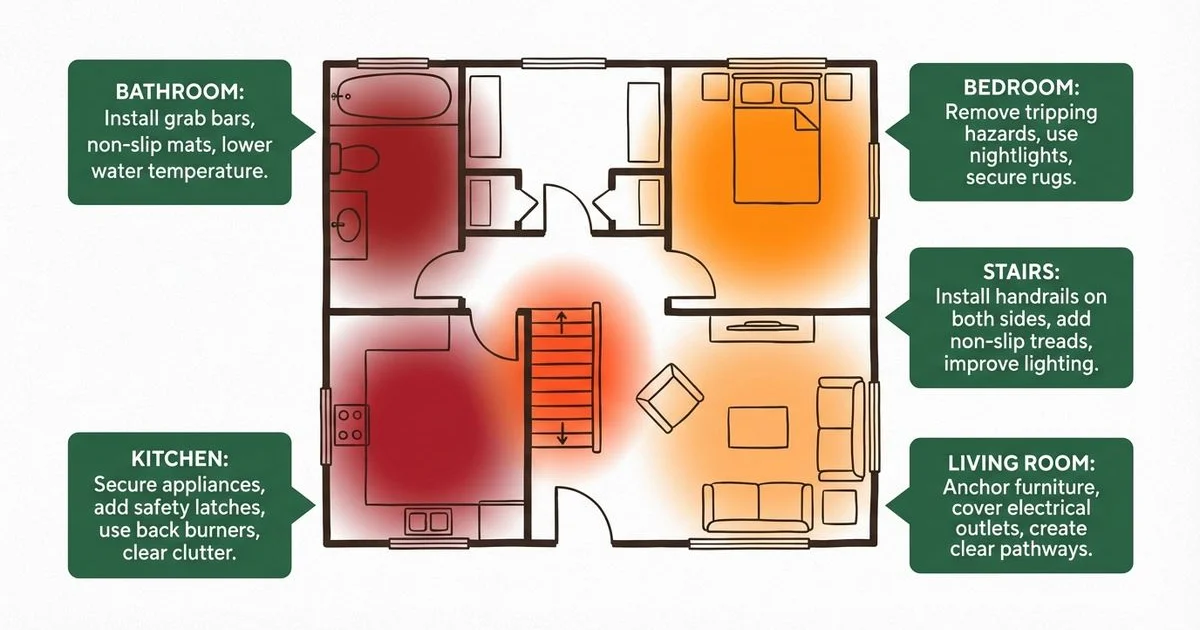
The 5 Most Dangerous Rooms in Your Home for Seniors (and How to Fix Them)
Discover which rooms pose the greatest fall and injury risks for seniors, with specific modifications to make each room safer.